Setting Up Entity Configurations
Once the entity organization structure has been constructed in the dashboard, the administrator needs to configure emission categories, report boundaries, base property and data aggregation methods for all entities, before the operator can input emission data into the system.
Configuring the Entity Emission Category List
Before inputting the emission data, the administrator needs to configure the emission categories for the entity.
Prerequisites
Contact your system administrator if your account does not meet the below requirements:
Ensure your account has the
view administratororsuper administratorrole.Ensure your account has permission to manage related entity data.
Procedure
Enter the data entry page from Preview Dashboard:
Click on Data Management > Organization in the left navigation pane. Select the view you wish to enter data in the view bar.
Select Configuration in the upper right corner to switch to the configuration mode.
Select the entity card and the entity emission data sidebar will appear.
Configure the emission categories in the Emission Source Tab.
- (Optional) Factor TemplateSelect an appropriate pre-set template from the dropdown list to facilitate emission data reporting with pre-defined emission information and factors.
Note
Administrators can set up pre-set templates for your organization, see setting up factor templates for details.
Reference Emission Standard: Select the emission standard. Supports GHG Protocol and ISO 14064.
Emission Category List: Select the final emission category list for the entity.
Select Save to finalize the entity emission category list configuration.
Configuring Entity Reporting Boundaries
Before calculating the carbon emission data, administrators need to configure the reporting boundary data for the entity. For different calculation methods, the system will use the corresponding reporting boundary data for aggregate calculation.
Prerequisites
Ensure that the entity you configure is an intermediate node or a leaf node, and the root node does not support the configuration of report boundary.
Ensure that your account has the administrator role.
If your account does not meet the above requirements or is unable to perform the configuration operation, please contact your system administrator.
Procedure
Click on Data Management > Organization in the left navigation pane. Select the view in the view bar above.
Select Configuration in the upper right corner to switch to configuration mode.
Select entity and the entity configuration sidebar appears on the right side of the screen.
Configure the report boundaries in the Settings tab. You can configure the boundary by equity share and operational control share, and the default is
100%.Click Save to complete the entity reporting boundary configuration.
Configuring Entity Data Sources
Before calculating the carbon emission data, administrators need to configure the data source and aggregation basis of the entity. At present, the configuration is supported in three ways: aggregate, key-in and reference.
Prerequisites
Ensure your account has the administrator role. Contact your system administrator if your account does not meet this requirement.
Procedure
Click on Data Management > Organization in the left navigation pane. Select the view you wish to configure data source.
Select Configuration in the upper right corner to switch to configuration mode.
Select entity and the entity configuration sidebar appears on the right side of the screen. In the Data tab, configure the data source, which is currently supported in three ways: aggregate, key-in and reference.
Aggregate: Select Aggregate to configure the aggregation basis. The default is Child Enity, i.e. bottom-up aggregation, layer by layer. In addition, you can choose the entity model as the aggregation method.
Key-in: Select Key-in, to directly enter data for the entity. The carbon emission data of its child entity do not participate in the aggregation accounting.
Reference: Select Reference to quote the carbon emission data of the entity in other views as the carbon emission data of the current entity. To use this function, you need to contact the super administrator to complete the configuration of the referenced view.
Click Save to complete the configuration of the entity data source.
Configuring Responsible Person and Entity Access Permission
After reporting boundaries and data source configurations have been set up, the administrators can begin assigning internal or external users to appropriate roles in each entity as operators, auditors, or viewers.
Prerequisites
Ensure that your account has a view admin or super admin role. Contact your system administrator if your account does not meet this requirement.
Ensure that you have added relevant staff members to the Application Portal Admin Console user groups.
You must first create user groups in the Application Portal Admin Console and assign correct users to each group, before you can grant your users access to Ark features in Ark.
See Managing User Groups for detailed instructions on how to configure user groups in the Application Portal Admin Console.
Procedure
Click on Data Management > Organization in the left navigation pane. Select the view you wish to assign roles to in the view bar.
Select Configuration in upper right corner to switch to enter editor mode.
Select the more button
 on the entity card that you want to assign roles to, then click Responsible Person Assignment.
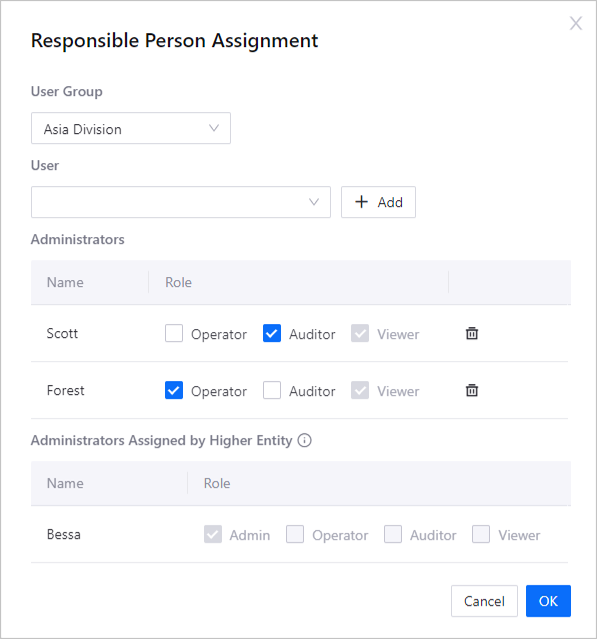
In the pop up window, select the user group you have created in the Application Portal Admin Console, then select the users you want to give access roles to in the entity.
Click + Add, selected users will be added to the administrators row.
Note
Every user added in responsible person assignment will be assigned viewer role by default.
Proceed to check operator or auditor boxes to assign access roles to designated users. For more information on the access scope for each role, see Key Roles.
Click OK to assign the above users as responsible roles for this entity.
Note
All entities with Key-in data source should be assigned with a person in charge as operator to input data.
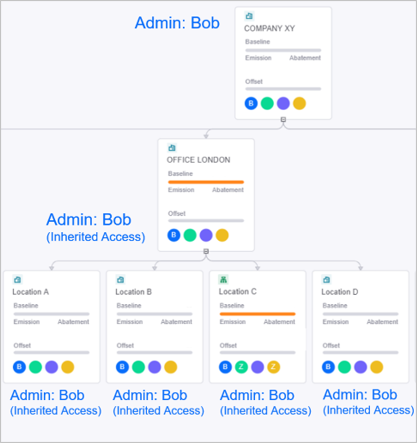
Role-based access permissions are inherited down the organization hierarchy. The child entity inherits role permissions from the parent entity. If Bob is assigned as an administrator for entity 1, then he will have admin rights to all the connected entity layers below. The same applies to auditors, viewers and operators.
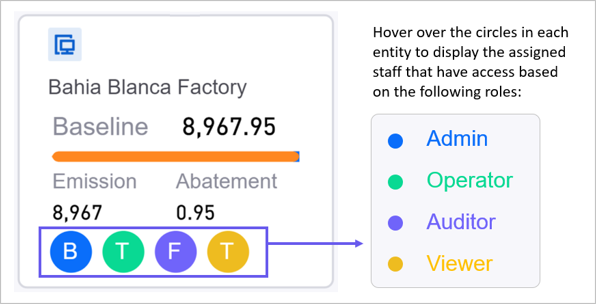
After configuring access permissions, you can view the responsible person assigned for each entity by hovering over the 4 color circles on the entity card:
Once roles are assigned, operators can begin inputting emission data. When the data configurations are complete, assigned auditors and viewers will be able to preview this data.