Managing Emissions View
Administrators will first create and configure emission entities and views to draft out the emission structure of the organization, so the operator can come in and enter activity data into each emission entity to calculate overall emissions for the organization.
Managing Views
This section shows how to create, edit, and remove views. Each view is a dashboard worksheet that you can use to organize your organization’s emission structure and preview the overall emissions profile.
Prerequisites
Ensure that you have registered a personal or business account with EnOS to access the EnOS Management Console.
Ensure that your account has the
super adminrole, otherwise contact your system administrator to apply for one. Views can only be added, edited, and deleted by super administrators.
Creating a View
Create a view to begin measuring your organization’s carbon profile.
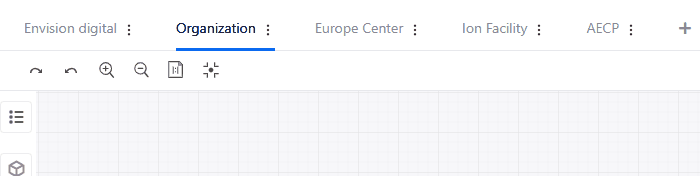
Select Data Management > Organization in the left navigation pane, then click Configuration in the toolbar to enter the editor dashboard.
Select + in the view tab to open the Create new view pop-up window.
Enter the View Name.
Note
Ark supports internationalization for name fields. Names input under the Chinese or English name field in
 will be displayed based on user’s EnOS environment language settings. When left blank or not compatible with user’s language settings, the default name will be displayed.
Select a Root Entity for this view.
If there are no entities available in the dashboard, you need to create a new entity as the Root Entity before creating a view. Follow the steps in creating an entity to create your Root Entity.
Root entity cannot be edited or deleted once the view is created.
Select OK and this view will appear to the right of the view tab.
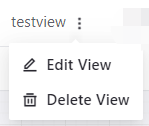
Editing and Deleting the View
To remove an existing view, hover over the more button  to the right of the view name, and click on the
  Delete View pop-up.
To make changes to an existing view, hover over the more button to the right of the view name, and click on the  Edit View pop-up. You can proceed to update the view name.
Rearranging View Tab Order
You can change the lineup order of view tabs by the following steps:
Select Data Management > Organization in the left navigation pane, then click Configuration in the toolbar to enter the editor dashboard.
Select the view name you wish to shift.
Drag and drop it to the center of the desired view’s position.
This will sort the view in front of that position.
Configure View Data Accounting Standard
Before entering carbon emissions data, administrators need to configure the data accounting method for the current view.
Procedure
Select Data Management > Organization in the left navigation menu. Select the view that you need to enter data.
Select Configuration in the upper right corner to switch to editor mode.
In the toolbar, click on the drop-down arrow and choose either Equity Share, or Operational Control as the current view’s accounting method.
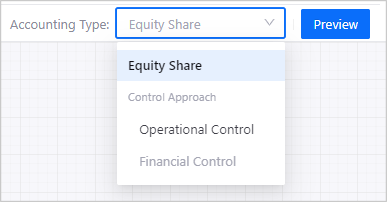
Click Save to save the view accounting method settings.
Managing View Permissions
In organizations with cross-regional branches and complex value chain operations, managing the data of your emission network in separate dashboard views with segregated access rights can be helpful to meet the different privacy requirements of regional offices, subsidiaries, or partners that have their own data policies. Super admins can assign view admins from related business units to outline their unique organizational structures and designate staff members within their organization to update emission data.
Prerequisites
Ensure that your account has the super admin role, otherwise contact your system administrator to apply for one.
Ensure that you have added relevant staff members to the Application Portal Admin Console user groups.
You must first create user groups in the Application Portal Admin Console and assign correct users to each group, before you can grant your users access to Ark features in Ark.
See Managing User Groups for detailed instructions on how to configure user groups in the Application Portal Admin Console.
Assigning View Administrators
You can assign admins to each view tab by the following steps:
Select Settings > Admin Configuration in the left navigation pane, then select the view you want to assign a view admin to. You can also use the search bar to quickly locate your view.
Click + Add Admin to start assigning roles.
In the pop up window, choose the User Group you have set up in Application Portal Admin Console. Under User Name, pick users you wish to assign as view admins.
Click Ok to add them as view admins.
If you want to remove any added administrator, click on the delete
button to the right of each user column.
For more information on the access scope for view admins, see Key Roles.